Wendy has spent the last couple of summers planting a garden for vegetables for us to eat in our backyard. One of the things she has read about is the idea of using raised gardens. We had been planting a traditional garden at ground level that we tilled up each year and planted. Most of the garden gets populated with weeds during the summer. The idea with the raised garden is that it gets above the normal level of seeds that weeds put out and prevents the spread of weeds into your garden. It also raises the level of the garden making working in the garden easier.
There are kits you can buy to make raised gardens, but with my engineering thought process I decided I wanted to make my own instead. It wound up costing more than I had planned, but I believe that what we have to show for it is pretty good. Most of the kits are made of wood, which are fine, but I don’t believe they will be very durable. I chose to go with stackable blocks like I used to make the retaining wall earlier this summer. The plan was to make two raised gardens that would be wide enough to allow two rows of plants running down them.
We had a big pile of sandy type poor soil from where I cleared out the area for the future tree house. I had dumped that soil in the back corner of our garden. The soil in our garden was good for growing as we had been adding organic matter to it over the last few years. I decided that I wanted to use the poorer soil as filler and put the good soil on top. This turned out to be a lot of work moving all of this soil around.
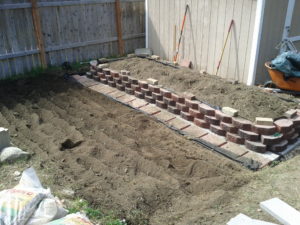
I started by using our tiller to break up all the top soil in the garden. This let me move the top soil off to the side. After taking some measurements, I began making the path that would go down the middle. I first put down a sheet of weed block material, hoping this will reduce the weeds at ground level. I then put down some gravel to help support the base for the pathway to sit on. I put the paving stones on top of the gravel to create the walking path. Each stone I put a level on to try to keep it level. I used a rubber mallet to pound the paver stones to get them level and to help them settle into the dirt.
Once I got the pathway put down, I started with my foundation for the first garden. I used a square point shovel to get the dirt flattened out. I once again used gravel to help provide a stable base for my foundation. I started with 1 1/2 inch thick rectangular cinder block. I made sure to level each of these front to back. I once again used the rubber mallet to level the blocks and help them set into the soil. Once I had the cinder blocks leveled out I began stacking the blocks on top of it.
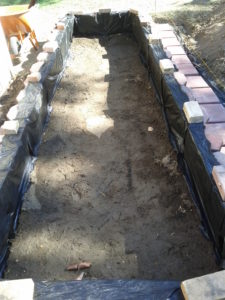
I stacked the blocks three high. Each block has a ridge on it that hooks on to the block below it to keep it from moving forward. Once I had the blocks stacked three high (not including the flat cinder block), I began putting more weed block fabric along the inside of the wall. There needs to be something behind the blocks to keep the soil from escaping once water starts getting in the dirt. Otherwise, all the soil will flow out the cracks in the wall.
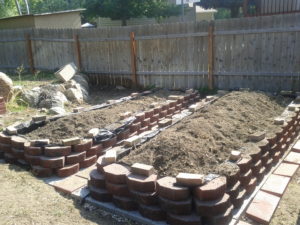
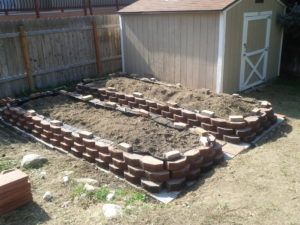
Once I had secured the weed block fabric around the interior of the wall, I began moving filler soil and top soil into the box. Once this was filled, I put down more paver stones on the outside of the box to make a walking path that went round the side. There wasn’t much space so I had to use a skinny block and I didn’t do much for leveling or keeping out the weeds.
With the first box complete, I did the same process for making the second box
Thankfully we live close to Home Depot as I had to make several trips there to get all the blocks. I have no idea how many I used but I would estimate that it was about 200. The moving of blocks from store shelf, to cart, to car, to wheel barrow, to the garden site was a lot of work. I plan to hook up the soaker hoses to irrigation system in the spring time. Before I put down the paver stones for the middle pathway, I put down a small soaker hose down the length of it. We plan to put down some kind of a moss or ground cover between the cracks in the blocks.
Over all it took about 3 days or so to get it all done. I think it was worth the extra effort as this is a raised garden that isn’t going away any time soon. Now to wait for next spring to fill it with the vegetables that Wendy makes me eat.


